.jpg)
.jpg) I'm back with some ideas for variations on the ornaments from yesterday!
I'm back with some ideas for variations on the ornaments from yesterday!There were all made using stuff I had on hand. I could probably do another set of variations after a trip to the craft store!
.
Idea #1:
Christmas ornament card.
(Excuse my crooked cutting of the red paper. This is kind of outside my milieu!)
(Excuse my crooked cutting of the red paper. This is kind of outside my milieu!)
.
.jpg) To make this, I just poked the hanging thread through a spangle and then through a small hole I punched in a card. A small piece of tape holds everything together on the inside. I would probably write a little blurb inside saying the ornament can be removed, fanned out, and hung on the tree.
To make this, I just poked the hanging thread through a spangle and then through a small hole I punched in a card. A small piece of tape holds everything together on the inside. I would probably write a little blurb inside saying the ornament can be removed, fanned out, and hung on the tree..
Idea #2:
Stringing multiple shapes together to make one bauble.
.
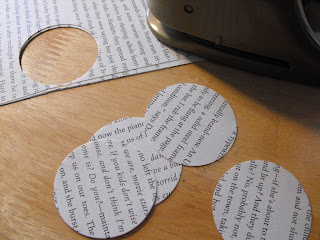
.jpg) I was given this circular die cutter for Christmas a few years ago, and I have to admit I've never found much of a use for it. I got it out, determined to use it for this project.
I was given this circular die cutter for Christmas a few years ago, and I have to admit I've never found much of a use for it. I got it out, determined to use it for this project.
I started cutting circles, thinking I might not go 3D at all. The plan was just to sew a bunch together in a line to make a garland.
.jpg) But as I was cutting the circles, I remembered how those garlands tend to tangle easily and often, so I scrapped that idea in favor of making little balls.
But as I was cutting the circles, I remembered how those garlands tend to tangle easily and often, so I scrapped that idea in favor of making little balls.
.jpg) The little balls were okay, but sort of plain and pitiful, so I ran three of them through the sewing machine, one after the other, to make a chain of three. Now that's more like it!
The little balls were okay, but sort of plain and pitiful, so I ran three of them through the sewing machine, one after the other, to make a chain of three. Now that's more like it!
.jpg) I like the subdued look of the basic ornaments, but just in case you're craving a little more glitz, you can bedeck them with sequins or glitter. I made a batch of paper snowflakes one year and painted them with the nicest iridescent glittery goop, but when I got it out, I found it had dried up.
I like the subdued look of the basic ornaments, but just in case you're craving a little more glitz, you can bedeck them with sequins or glitter. I made a batch of paper snowflakes one year and painted them with the nicest iridescent glittery goop, but when I got it out, I found it had dried up.
.jpg) So, I went the way of sequins instead. I think these would look wonderful decorated with just silver and gold, but I tried it with multicolors just for fun. Just remember, the more layers you use, the more surfaces you'll have to decorate! It was fun doing one, but I confess I'm not too anxious to do more!
So, I went the way of sequins instead. I think these would look wonderful decorated with just silver and gold, but I tried it with multicolors just for fun. Just remember, the more layers you use, the more surfaces you'll have to decorate! It was fun doing one, but I confess I'm not too anxious to do more!
Stringing multiple shapes together to make one bauble.
.
.jpg) I was given this circular die cutter for Christmas a few years ago, and I have to admit I've never found much of a use for it. I got it out, determined to use it for this project.
I was given this circular die cutter for Christmas a few years ago, and I have to admit I've never found much of a use for it. I got it out, determined to use it for this project. I started cutting circles, thinking I might not go 3D at all. The plan was just to sew a bunch together in a line to make a garland.
.jpg) But as I was cutting the circles, I remembered how those garlands tend to tangle easily and often, so I scrapped that idea in favor of making little balls.The little balls were okay, but sort of plain and pitiful, so I ran three of them through the sewing machine, one after the other, to make a chain of three. Now that's more like it!
But as I was cutting the circles, I remembered how those garlands tend to tangle easily and often, so I scrapped that idea in favor of making little balls.The little balls were okay, but sort of plain and pitiful, so I ran three of them through the sewing machine, one after the other, to make a chain of three. Now that's more like it! .
Idea #3:
Add sparkle.
.
.
.jpg) I like the subdued look of the basic ornaments, but just in case you're craving a little more glitz, you can bedeck them with sequins or glitter. I made a batch of paper snowflakes one year and painted them with the nicest iridescent glittery goop, but when I got it out, I found it had dried up.
I like the subdued look of the basic ornaments, but just in case you're craving a little more glitz, you can bedeck them with sequins or glitter. I made a batch of paper snowflakes one year and painted them with the nicest iridescent glittery goop, but when I got it out, I found it had dried up..jpg) So, I went the way of sequins instead. I think these would look wonderful decorated with just silver and gold, but I tried it with multicolors just for fun. Just remember, the more layers you use, the more surfaces you'll have to decorate! It was fun doing one, but I confess I'm not too anxious to do more!
So, I went the way of sequins instead. I think these would look wonderful decorated with just silver and gold, but I tried it with multicolors just for fun. Just remember, the more layers you use, the more surfaces you'll have to decorate! It was fun doing one, but I confess I'm not too anxious to do more!.
Idea #4:
Idea #4:
Trim the bells with...bells!
.
.jpg) Okay, that isn't really a bell (I didn't have one), it's a bead, but you get the idea!
Okay, that isn't really a bell (I didn't have one), it's a bead, but you get the idea!
.
.jpg) Okay, that isn't really a bell (I didn't have one), it's a bead, but you get the idea!
Okay, that isn't really a bell (I didn't have one), it's a bead, but you get the idea!Now, what other ideas can we come up with?
Tell you what...let's make this a GIVEAWAY!
Post your idea for a variation either here in the comments or on your blog (but please link back to this post and let me know in the comments), and I will enter you to win a little Christmas treat!
(I will update when I decide on a prize.)
(I will update when I decide on a prize.)
The winner will be chosen by the person who taught me everything I know about Christmas craftiness: My mom!
I will leave the contest open for a LONG time, because it's so early. The deadline for entries will be...oh...let's see...December 6th. You have plenty of time to come up with ideas!


9 comments:
CONTEST ENTRY!
Glitter around the outside edges.
Run a line of glue, then sprinkle on some fine glitter.
Mags
Is that what you're looking for or a whole different idea?!
i think making a ball of mistle toe out of paper and sequins would eb cute !!
idea #2. SNOWFLAKES !!!
i LOVE 3-D stuff esp snowflakes !
add in some white & silver sequins to make em glisten !
you could also distress it with ink giving it a little bit more dimension. Put the sequins or rhinestones on with glitter glue--maybe silver to make them pop. Snowflakes are a good idea too, you can use some irresdescent glitter to give them that snow in the sun look. I'll think of more later, i'm sure.
Cynthia
this is a contest entry
i love your craft ideas. the idea of cutting up pictures is a bit scary, but those ornaments would make the perfect gift for grandma or for the family tree, try it!
Mags, that's exactly what I'm looking for: start with this idea and go from there! The results should just bear SOME resemblance to the originals!
As I was cutting out leaves for a "thankful" project, I noticed that if you did the pattern of an oak leaf this way, it would look like a pine cone. Add glitter for more sparkle. This oak leaf (top left): http://www.enchantedlearning.com/crafts/leaf/leaftemplate.GIF
Thank you for this very cool idea.. and I love love love how simple you have made it.
For idea number 2 I would vary it some by spray painting 2 of the sections gold or silver. I would also make some variations with just one section spray painted.
I'd say cut out a scalloped edge of old book pages, roll & fold into a flower, glue to a felt circle as backing with a pin on it as a brooch. PLUS GLITTER on the edges. :)
Post a Comment