Showing posts with label crafts. Show all posts

Saturday, May 5, 2012

C'mon the U!


Come on, you boys in blue!

Soccer season is in full swing, and while waiting for today's Philadelphia Union game, I decided to get crafty and make a bracelet to show my support on game days!  You might remember that I'm pretty thrifty when it comes to buying team paraphernalia.  Check out my previous project here!


I got the idea to make these at Jo-Ann Fabrics, where I spotted these little soccer ball beads.  They have other sports as well, so you could make these for a baseball team, basketball, etc.  You're out of luck if you're looking for hockey pucks, though! 


Here's how it looks with the friendship bracelet I made in Union colors.  I can remember churning out those bracelets as a kid, but it took me a while to get the hang of it again!  Now that I've learned the basic technique, I want to make a wider one for my husband. 

Wednesday, January 11, 2012

Yum


Oh.  My.  Goodness.
Would you look at what my friend made?


The details are amazing!
And the cookies are quite delicious as well!

I think even I could handle these simpler ones.
The spool cookie cutter is available through Foose Tinsmithing.
Foose is a local company I love to support!
I found the button-shaped cookie cutter at Fancy Flours.

Oh my.  There are some VERY cute cookie cutters there that are made to perch on the rim of a mug

Sunday, January 1, 2012

Parsnips with Personality!

Here is one of those top-secret craft projects I was working on for Christmas:  parsnips with personality!  This year I was determined to gift my husband with homemade gifts.  Between the things I made and etsy, he only ended up with one commercially manufactured gift: a hat.  And now that I think about it, I'm a little upset with myself about that one, because it's something I could have made! 

Why parsnips?  Because Gerry loves parsnips like only an Irishman could.  We even grew our own parsnips from seed this year, and we are not enthusiastic gardeners!  One night I was checking etsy to see if the same seeds we grew this summer were available (not yet) and spotted a cute parsnip Christmas decoration from tazzyb on etsy.

Inspiration Parsnip


One change I made was to make the greens a little less antler-like.  Unfortunately, that also meant I didn't have such a great place to attach a hanger.  To solve that problem, I added some structure to the greens with floral wire--just bent it into shape and stitched it onto the felt.  The stiffened felt they sell would have worked as well, but I was determined to make do with what I had!

I just asked Gerry to contribute a comment to the blog about his parsnips.  Here is what he said:  I was surprised, and my heart was warmed by them! 

Thursday, December 22, 2011

Health, Harmony, and Balance


So enough with the teasing...I was making miniature prayer flags! 

I've always loved the images of prayer flags in the Himalayas and the meaning behind them, so I thought it would be neat to make a little mini version for my Christmas tree.  I ended up going in a different direction with the tree this year, but still used the idea to make gifts for my friends at work. 

One of my favorite things about this project is it allowed me to use up some of the small pieces of fabric I've been saving!  I keep all my scraps sorted by color in big ziploc bags. 

 I rooted through the bags to find the five colors I needed: blue, white, red, yellow and green. 

I cut the individual blocks without measuring.  I wanted the finished product to be kind of loose and free and organic, so measuring or using a rotary cutter wouldn't have been appropriate!

 I used both solid and print fabrics.  If you are going to do the next step and rubber stamp on the flags, just try to use subtle prints so the words show up.  I think the flags would also be effective sans words, in which case you can use more busy prints, but for the ones I was giving as gifts, I wanted their meanings to be clear.

This little set of rubber stamps came from JoAnn Fabrics, and I bought it with a 50% off coupon.  It is a handy little thing to have around.

Each color represents one of the elements.  Blue is sky; white is air; red is fire; green is water; and yellow is earth.  You are going to want to do these assembly-line style!
Make yourself a pile of each color so you can just sit down at the sewing machine and fly through them!

Again, I'm not being very precise here.  I didn't want the finished banners to come out too perfect.  Just fold the top bit over a length of hemp cord...
...and sew a little channel in the flag.  Be careful not to catch the cording in the stitches!

I didn't clip the thread after each flag, because that would a) waste a lot of thread and b) take longer.  I just moved a little ways down the cording and continued with the next color.
It's sort of reminiscent of when I made my first quilt ever!

Once you have all five colors on there, you can cut all those threads at once.
Nice and neat.

Then slide all your flags together and tie a knot at each end so they don't slide right off the cording!

And there you have it!
I am including a little explanation with the flags, explaining that my simplified version of prayer flags is meant to be a wish for health, harmony, and balance in the coming year. 
Sunday, December 18, 2011

Thursday, December 15, 2011

Tom Terrific


This year, I am involved in an ornament swap with a group of online friends.   My swap buddy is an avid fan of the Boston-based sports teams, so I knew immediately I wanted to make something related to the New England Patriots.  Initially, I tried to recreate their logo in felt, but that didn't go too well, so I tackled (ahem) Tom Brady's jersey instead. 


Now I'm not normally a fan of that stiff felt, but it was the perfect thing for this project, because the cuts come out so crisp and neat.  I will keep that in mind for future crafting! 

Saturday, December 10, 2011

Wee Gifts

 wocka wocka

Been working on some little gifts for Christmas!
Some I can't show, but here's a little sample.

As I was making these catnip mice for other people's cats, one of mine came sniffing around and gave me the big eyes. 
Guess I'll consider her quality control.

Thursday, October 27, 2011

Project Runway, Holiday Edition

Before I begin, I want to say that I have NOT forgotten the giveaway, nor have I abandoned my closet project. Both are still in the works, they've just been on the back burner for the past few weeks. See, there's the little matter of my mom's 75th birthday, which is this Sunday. We're having a party, and I've been preoccupied with getting things ready for the big day. I'm making a scrapbook of her childhood photos, creating a trivia quiz, and curating mom artifacts to put on display. Hopefully I'll have some pictures to share!

ANYWAY, what you see above is another one of my entries in the Project Runway contest. We each randomly chose a holiday-themed bandana from a bag, and our challenge was to create an outfit to reflect that holiday, using the bandana as part of the design. I ended up with Valentine's Day. At first I was happy, because the bandana was one of the prettier ones, but then I began to wonder, "What kind of outfit is typical for Valentine's Day?" Well, all I could think of was lingerie. For twelve out of the fourteen days we were allotted to finish this challenge, I joked about making lingerie and tried to think of something else. On the thirteenth day, I faced facts: I had no better ideas, so I really was going to make lingerie.

Lucky for me, I had a pile of stretch lace on hand, from previous experiments in making undies. Even luckier for me, the pattern on the lace leant itself to forming a bustier-style top for my doll.

The bandana became her dressing gown, embellished with appliques, lace, pearls, and ribbon roses. Unlucky for me, I had none of that on hand and ended up spending $11 to add a few frills!


Tonight is the finale of the real Project Runway. Have you been watching? I am not happy with the final four. I think my Barbie clothes are better than some of the stuff they're showing!

Tuesday, October 11, 2011

Office Supply Challenge

Back with another Project Runway challenge! This was a hard one! We were asked to make outfits for our Barbies using common office supplies. Given my penchant for making things more difficult than they need to be, I immediately swore off Post-It notes. I guessed that there would be several Post-It entries due to the array of colors available. Three of the other four entries used Post-It products, so my instinct was correct. I also got hung up on using "common" supplies. There are all sorts of novelty office supplies out there these days, but I declared them off limits.


So here is what I ended up with! First, I stripped the vinyl from a three-ring binder to make "leather" pants. Let me assure you, pulling vinyl pants onto a plastic doll's body is not easy. Size UP if you are going to try it! The top is made from a padded envelope. I wanted to make some sort of parka or vest from it and create a look for skiing, but it turned out to be much harder to work with the bubble wrap than I thought, so I settled for a "quilted" top. Then, as a closure, I used brass brads and wound a strip of vinyl around them, interoffice-envelope style.


This is definitely one of the more subtle looks this week, so I don't know how it will fare in the judging, but I was happy just to have an outfit to send down the runway!

Sunday, October 2, 2011

Another Project Runway Challenge

Closet clearing is on the agenda for later today, but in the meantime, let me share another challenge from the Project Runway Junior contest I'm involved with at work. This is my entry for the Mini Me challenge.


Looks just like me, right? No head! I crack myself up!


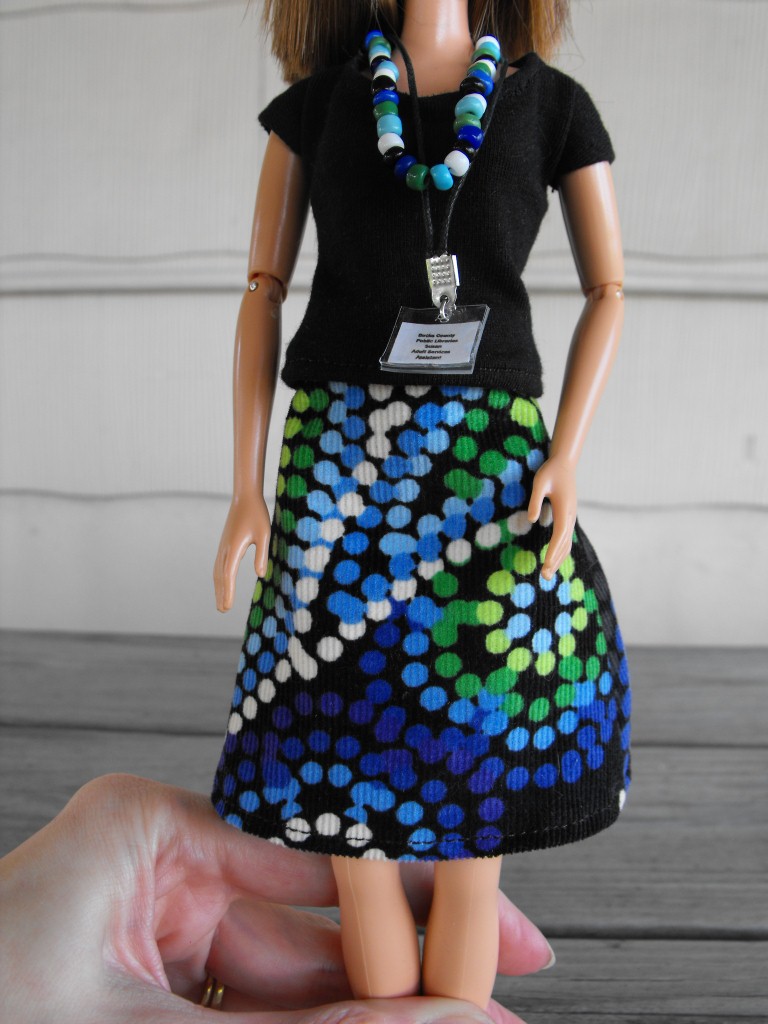
Okay, there I am, head to toe. I decided to go with the me they know at work: skirt, mary janes, necklace, lanyard and nametag. I don't think I was ever so thankful for wearing so many skirts--I didn't have to try to make a pair of pants!


But I did have to make a pair of glasses. Mine are rimless on the bottom, so I replicated them with a piece of wire and cello tape lenses. This was how they looked until someone said they looked like Sarah Palin's glasses. Then I trimmed them a bit so they wouldn't look so square!

No Mini Me would be complete without a large wardrobe of skirts and the two furry ones!

I fashioned tiny copies of Abigail and Eloise from white pipe cleaners and used markers to give them their markings.

I made most of the skirts following the same steps I use to make my favorite a-line skirts from New Look 6843, complete with darts and tiny waistband.


This one really tickled me--a novelty print of Paris in a scale just perfect for the doll!

Besides skirts, mary janes, and cats, my other trademark is scarves, so I wanted to have at least one in my Mini Me wardrobe.


And I added a little decorative stitching on the skirt to tie everything together. You can't really tell, but I made this as a wrap skirt, following the instructions in the Sew What! Skirts book on a teeny tiny scale.


Mini Petunia!

Sunday, August 21, 2011

Project Runway Junior-Challenge One

The first challenge in the Project Runway game I'm playing was to make an outfit for Barbie using plastic bags. As soon as I heard that, I was on the hunt for "good" bags, meaning something besides the thin, crinkly ones you get at the grocery store. If I saw a bag that was a nice color (no pool-liner blue for me, please) or one that was a good weight (either heavy enough to sew or thin enough to be pliant), I seized it for my stash.


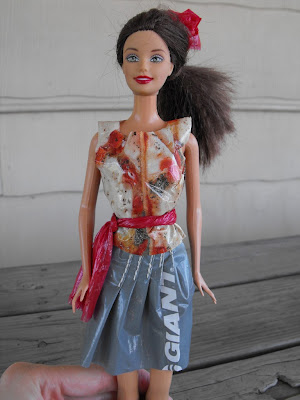
Someone brought me a bag with a photograph of a pizza on it, and that became the inspiration for this outfit. The top was cut from a portion of that bag (mmm, a pizza blouse). Between working with plastic and having to fit Barbie's crazy shape, this was a lot harder than I expected. I was able to sew on the skirt plastic without a problem, but I needed cellophane tape "interfacing" on the reverse side of the blouse in order to sew it on the machine.


The skirt was cut from a small bag with a grey triangle printed on it. The shape of the triangle gave me the idea for the graduated pleats in front. A newspaper delivery bag provided the material for the sash.


One of the bags I used had this recycling logo printed on the bottom, so I decided she must have a reusable shopping bag of her very own.


I made a second look using freezer bags. Gerry calls this one the Mad Men dress.
If you look closely, you can see the snowflakes printed on the bags!


Our next challenge is to dress a doll as a book character. I have one in mind, but I'm open to suggestions! Which character would you choose?